
Drawing an alpine goat can make for an interesting topic because alpine goats are renowned for their unique appearance and lively personalities. Here, I told you a story that shows why I decided to write this article, on how to draw an alpine goat.

My personal Story why I decided to draw an alpine goat
One day, I was on my journey to the serene Alps in Switzerland. One day I was enjoying the beautiful scenery of nature, and suddenly I stumbled upon an alpine goat. She was so beautiful that I gave her the name Bella. She was standing majestically against the backdrop of the stunning sunset. She had the most striking white coat and gentlest eyes. Inspired by her grace and beauty, I decided to capture her beauty with innocence on paper and now I show you how to draw an alpine goat Step-by-Step.In this guidance, we’ll show you how to draw an alpine goat in six steps. The final picture of an alpine goat precipitously builds from this regular assignment that builds upon each previous step. To draw an Alpine goat, follow the simple steps in the tutorial and draw the area indicated in red for each step. , this tutorial will walk you through drawing an authentic and detailed Alpine goat. Once that is done, you will have a quick and easy drawing of an alpine goat.
Before we begin, here are some fun facts about alpine goats that you might find interesting.
- Origin: Alpine goats originated in the French Alps. It is the oldest domesticated breed. These goats are loved by humans, especially by children.
- Adaptability : Alpine goats are known for their adaptability. It can thrive in various climates and environments, from mountainous regions to flat landscapes.
- Milk production: Alpine goats are known for their high-quality creamy milk often used to make cheese and other dairy products.
- Lovely Appearance: Alpine goats are known for their lovely appearance, personally I also love them. They have a characteristic appearance of medium to large size, straight profiles, erect ears, and colors and patterns.
- Friendly behavior: They are social animals and prefer to live in groups, often forming strong bonds with their herd mates. Alpine goats are friendly and highly curious, however, they can be strongly independent and strong-willed.
- Hardy breed: They are hardy and adapt perfectly to indoor systems, even in pastures and mountain conditions.
- Long lifespan: Alpine goats are known for their longevity, with an average lifespan of 10 to 12 years. With proper care and nutrition, they can live even longer.
- Agile climbers: the alpine goat’s are known for their agility and sure-footedness which allow them for climbing steep, rocky slopes, with pitches exceeding 60°.
- Fluffy coats: Alpine goats have fluffy coats that help isulate them from cold temperatures of their mountain habitat.
MATERIALS YOU NEEDED
- A high-quality drawing paper or a sketchbook.
- Pencils (2B and 4B for shading and HB for sketching).
- Kneaded Eraser.
- A Sharpener.
- The Reference image of an alpine goat.
Before starting the tutorial, do these two preliminary steps:
Step 1: Gather Reference Image
Before drawing anything this step is important according to me. Before you begin, having a strong understanding of your subject is essential. Find reference photos of alpine goats taken from various angles of good quality.Take note of their distinctive characteristics, which include their thin, long legs, curved horns, and varied facial expressions. It helps you to understand what to draw first.

Step 2: SKETCH THE BASIC SHAPES
Draw the alpine goat's body with fluidity, including the basic shapes. This stage requires the use of an HB pencil. Draw two circles, one for the head and one for the body, to symbolize the neck and legs. You will be updating them, so keep them light and loose.
Step 1: Drawing the head
The goat's head is the most suggestive aspect, so focus on it. When drawing eyes, be cautious to capture their positioning and contour. Take note of the nose, mouth, and other noticeable face characteristics. To illustrate the crooked affluence form and texture, use a flashback.
 Step 2: Draw the floppy ears and a horn.
You also add character and charm to your artwork by drawing cornucopias and things with drooping realization, because I also love this step. Draw the original shapes, the round for the head, and the two stretched spheres for cognizance. Draw crooked lines for the cornucopias, paying attention to their spiral forms. Focus on the cognizance's texture, using small brushstrokes to give it a drooping, elastic aspect. Add depth by shadowing the cornucopias to give them a more substantial and realistic appearance.
Step 3: Now you can draw the body of the goat.
The body of an Alpine goat is drawn by first creating a large round for the torso. The body of an Alpine goat is drawn by first creating a large round for the torso. To represent the casket, add a lower round and join them with a crooked line to represent the spine. Make sure to depict the length and shape of the four thin legs directly in your delineation. Include a little tail on the reverse. Add distinct muscle structures and outlines to upgrade the shapes. ultimately, outline the texture of the goat's fur using light strokes, taking note of the direction in which the fur grows.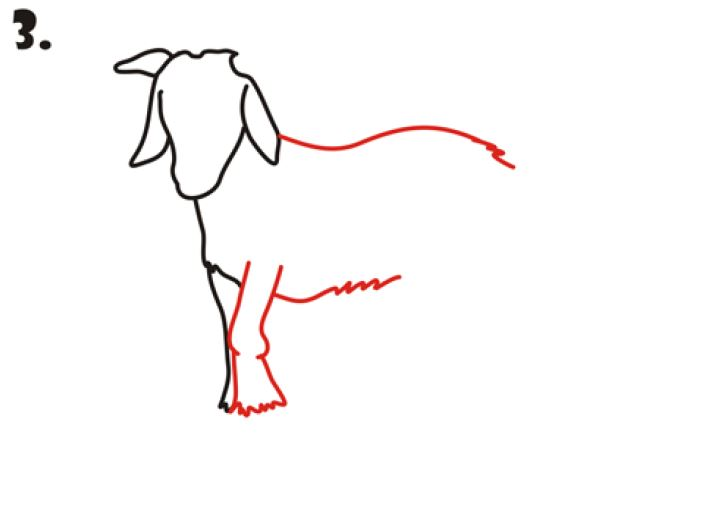
STEP 4 DRAW THE BACK LEGS AND TAIL
Illustrating an alpine goat's back legs and tail. Starting with two twisted lines extending from the body for each leg. Sketch the reverse legs and tail. Using defined muscles, form the legs until they taper down to the hooves. For literalism, add joints at the hocks and knees. Draw the scapegoat's tail as a little tufted shape at the reverse, clinging to the body's natural wind. The legs and tail should be shadowed and detailed to the alpine goat's overall fur and texture.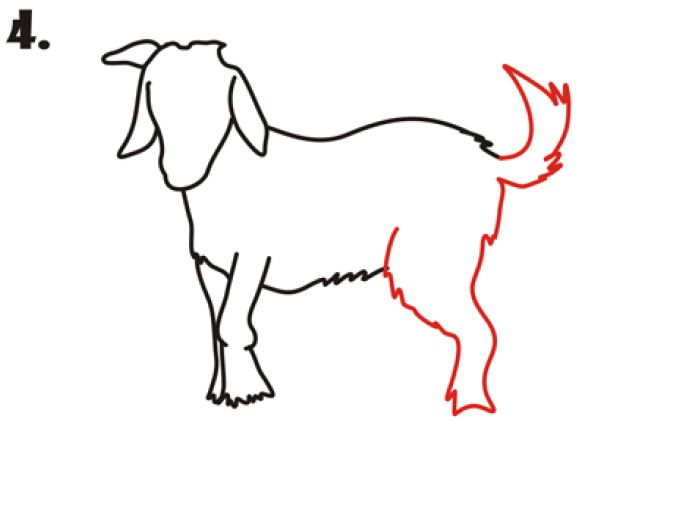
Step 5: SKETCH IN THE FACIAL FEATURES AND LAST LEG
Detail and scrupulous observation are needed when sketching the Alpine scapegoat's face and hind legs. Draw the scapegoat's face first, paying particular attention to its mouth, nose, and eyes to convey its expression. Add the characteristic twisted cornucopias after that. Take note of the final placement of your legs. Outline the shape with light brushstrokes and add subtle shading to punctuate the muscle and bone structure. To ameliorate literalism, pay attention to the texture of the fur. Delicacy and detail will increase with practice.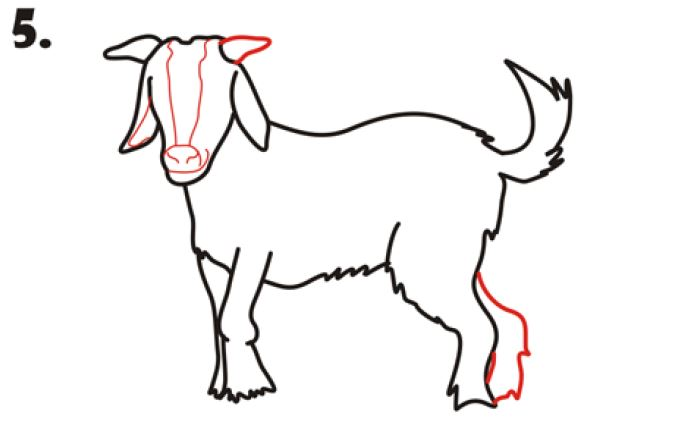
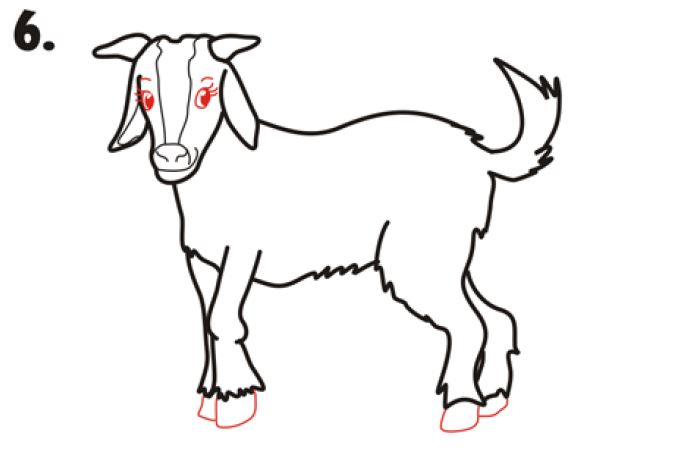
Step 6: Draw the eyes and hooves to finish your Alpine Goat drawing.
Focus on the eyes and hooves, when drawing a realistic alpine goat. The eyes are crucial, so draw almond shapes with detailed irises and pupils for that special look. Add some shading to give depth. For the hooves, sketch the split shape, don't forget to include texture and shading for realism. Make sure the hooves look strong to match the goat's natural stance. These final touches will make your Alpine goat drawing come alive, highlighting its unique features and personality.
Congratulations
you did it! congratulations on drawing an alpine goat. your first try may have gone slower than you had hoped. The best way to draw an alpine goat is to practice. keep practicing and exploring new techniques. Your talent will continue to flourish. great work! you can also visit how to draw a hummingbird
CONCLUSION
You completed your drawing of the alpine goat, that's great. Drawing an Alpine goat requires tolerance and attention to detail. By following this way and practicing regularly, you will grip your drawing and be able to capture the beauty and character of these fascinating creatures.IMPORTANT TIP:
Every artist has their unique style, so do not be hysterical about trying to make your drawing your own.
FAQS about how to draw an alpine goat
The FAQS are mostly asked by my students:
What aspects should concentrate on drawing Alpine goats?
- Its beard,
- curved horns
- cloven hooves
- head and body shape.
- Take note of the fur's texture, which might differ in thickness and length.
How can I depict the feel of the fur of an alpine goat?
Use short, fast strokes for the shorter fur and longer, more flowing strokes for the longer fur parts to accurately depict the texture of an alpine goat's fur. Experiment with different stroke lengths and directions, to produce a realistic fur texture, and to give volume, depth, and layer the strokes.
What techniques can I use to add realism to my alpine goat drawing?
- shading and highlighting to create depth and dimension.
- Observe real-life goats or high-quality photos to understand.
Pay attention to small details such as
- the texture of the fur,
- the shape of the eyes, and
- the contours of the muscles.
0 Comments